1 Getting started
1.1 Setup App
The Tentacle Setup App allows you to synchronize, monitor, setup and change basic parameters of your Tentacle device. This includes settings such as timecode, frame rate, device name & icon, output volume, battery status, user bits and more. You can download the Setup App here:


Enable Bluetooth on your mobile device
The Setup App will need to communicate with your TRACK E devices via Bluetooth. Make sure Bluetooth is activated on your mobile device. You must grant the app the necessary permissions as well. The Android version also asks for a ‚location permission‘. This is only needed to receive Bluetooth data from your TRACK E. The app does not use or store your current location data in any way.
Switch on your TRACK E
Before starting the app it is recommended to switch on your TRACK E devices. Pull down the user switch on the side to turn on your TRACK E. The device will indicate powering ON with a blue animation of the level LED. Once it’s powered up, the status LED will be pulsating in white for ‚standby‘.
During operation, the TRACK E constantly transmits status and recording information via Bluetooth to the app. Even in the event of a lost connection, the audio recording continues without disruption as it is stored locally on the microSD card inside the recorder.
Add a new device
If you open the Tentacle Setup App for the first time, the device list will be empty. You can add new TRACK E audio recorders and SYNC E timecode generators by tapping on + Add Device. This will show a list of available Tentacle devices nearby. Select the one, you would like to add to the list and tap on it. Hold your Tentacle device close to your phone to finish the procedure. This ensures that only you have access to your Tentacles and not someone else nearby. Once a Tentacle is added to the list, it will appear automatically in the device list, next time the app is opened.
2 Timecode Synchronization
2.1 Wireless Sync
With your Setup App, you can easily synchronize all of your TRACK E and SYNC E devices with one button click. At the bottom of your screen you’ll find the SYNC button.
- Tap on SYNC and a small window will pop up
- Click on the frame rate and select the desired frame rate from the drop down menu
- Time of Day is predefined as a starting timecode. For custom timecode tap on the timecode and choose your desired value.
- Press START and all Tentacles will synchronize one after another within a few seconds
Once your Tentacle devices are synchronized, the app displays Sync Done.
2.2 Timecode Jam-Sync
The microphone input can be used to jam-sync your TRACK E with timecode from any external timecode source via cable. Once your TRACK E is turned on, you can jam-sync it as long as there is no other action done (e.g. wireless sync via app or start a recording).
Here are suitable adapter cables in our online store:
3 Recording
To start a recording with your TRACK E timecode audio recorder, you can start and stop it via Setup App or directly at each TRACK E device. With the Setup App all of your TRACK E devices can be started at once or each TRACK E individually in case you are not working with all of your devices at the same time.
3.1 Multiple track recording
At the bottom of the screen you’ll find two buttons for RECORD and STOP. These buttons start and stop the recording of all TRACK E devices in your list.
3.2 Single track recording
Next to each TRACK E status information in the device list is a REC button as well, which starts and stops the recording just for this single TRACK E.
3.3 Independent recording via User Switch (assignable)
If you are unable to use the app or don’t want to, you are still able to operate your TRACK E devices directly via the User Switch.
4 Setup App
4.1 Device List
Once your devices have been added to the list, you can check the most important status information of each unit at a glance. You will be able to visually monitor the level meter, recording file format, recording time, frame rate, timecode, battery status, Bluetooth connection, device icon and name.
If a TRACK E is out of Bluetooth range for more than 10 seconds, the status and timecode of it will be maintained. If the app hasn't received any updates for more than 10 minutes, Last seen x minutes ago will be shown.
Depending on the physical distance of a Tentacle device to your mobile device, the status information in the list will be highlighted. The closer the TRACK E gets to your mobile device the more saturated the color will be, so you can easily identify each device.
Remove device
You can remove a Tentacle TRACK E from the list by swiping to the left and confirm the removal.
Monitor device
You can listen to the signal of a TRACK E through your smartphone. Swipe the TRACK E to the left and click on the speaker-symbol on iOS. Swipe to the right right on Android. You can monitor a maximum of one device at a time.
Device Warnings
Devices have to be synchronized: This warning message is displayed, when inaccuracies of more than half a frame occur between all devices listed. Sometimes this warning can pop up for a few seconds, when starting the app from background. In most cases the app just needs some time to check the information of each Tentacle device. However, if the warning message persists for more than 10 seconds you should consider re-syncing your Tentacles.
Bottom Sheet
You can find the Bottom Sheet at the bottom of the device list. It can be expanded by swiping it upwards. In addition to the previously described sync and recording functions, it contains features that can be applied to multiple/all devices.
| Sleep Mode | While in sleep Mode, your TRACK E saves battery and can be activated remotely. Send all your TRACK E devices to sleep by swiping up the bottom sheet and pressing the SLEEP button. Wake up the devices by pressing the WAKE button. You can wake them individually by touching the TRACK E in the device list. You need to synchronize your devices again after waking them up. Also note that when a sleeping device is connected via USB, it switches to charging mode and turns off. |
|
Please note
Sleep Mode is supported by Firmware version 2.2.0 or newer.
|
|
| Set All |
To apply settings to all your TRACK E devices, use the "Set All" feature:
|
4.2 TRACK E View
Pressing a TRACK E in the device list initiates a connection to the device, allowing access to its settings.
An active Bluetooth® connection will be indicated by a blue status LED at your TRACK E.
The TRACK E device view is divided into:
Header / Recording Tab / Playback Tab / Settings Tab
Device View: Header
| Device Icon | Here, the current device icon is displayed. Click on the icon to show the device icon selection and change it. |
| Status | |
| Device Status | The current state of your device is displayed here |
| Timecode | The current timecode of your device is displayed here |
| Icons | The state of battery, recording format and other is displyed here |
| Audio Monitoring | Clicking the Monitoring button starts listening to the audio signal via the smartphone. Long Press allows you to set the monitoring mode: |
| Earpiece Monitoring | Monitoring via smartphone earpiece is activated, as soon as the smartphone is held close to the ear. |
| Loudspeaker Monitoring | Monitoring via smartphone speaker is activated by clicking on the speaker button. All headphones recommended by the smartphone manufacturer can also be used here. |
|
Please note
The utilization of Bluetooth may result in a time delay during monitoring, which varies based on the device and is further amplified when Bluetooth headphones are employed.
|
|
| Level Meter | Check the level of you input signal in dB |
Device View: Recording Tab
| Recording Time | The recording time of your current audio clip is displayed here |
| Remaining Recording Time | Shows the remaining recording time of the microSD card |
| File Name | Next to recording time, you can find the file name of your upcoming/currently recording audio file |
| Waveform Display | Monitors the recording as a waveform visualization. It will be orange coloured during an audio recording |
| Recording Gain | Adjust your recording gain here. This is important if you choose 48kHz / 24-bit recording format |
| Record Button | Start and stop the recording here |
| Low Cut Filter | If this filter is ON, it will reduce noise for all frequencies lower than 80Hz. This can be useful if you ant to clean up your signal from low frequency background noise |
| Mic Plugin Power | The mic plug-in power is set to ON in the standard settings and has 5V. With this plug-in power, you can use all electret lavalier microphones. You can turn it OFF if you are working with dynamic microphones. |
|
Please note:
Usually the enabled plug-in power doesn't affect most dynamic microphones. However, this does not apply to every model. So please check with the microphone’s manufacturer. Plug-in power turned OFF extends battery life.
|
|
Device View: Playback Tab
In this section of the menu, you can listen to your recorded files. Connect your headphones to the 3.5 mm headphone out of the TRACK E or use the audio monitoring feature via smartphone (see "Audio monitoring"). Make sure to set your headphone volume accordingly.
| Playback | In playback mode, the status LED will be green |


|
Here you can skip between the recorded files |


|
Each time you tap, the speed will double. It can play your file up to 64x faster than the regular speed |


|
Stop / Play |
| File information | Here you can find all the information about each recorded audio file |
| Name | Shows the name and number of the file |
| Channel Count | Mono |
| Sample Rate | 48 kHz |
| Recording Bit Depth | Shows the recording format 32-bit or 24-bit |
| Length | Shows the length of each clip |
| Timecode | Shows the timecode and frame rate |
Device View: Settings Tab
| Device Name | Change the predefined device name by simply clicking on the name field. After changing the name, please confirm by pressing the ‚return‘ button |
|
Please note:
Renaming the device creates a new folder on your microSD card with the same name.
|
|
| Recording Format | |
| 48 kHz / 32-bit Float | This format records 32-bit float WAV files. Adjusting the recording gain is not required. As long as maximum input levels are not exceeded, both quiet and loud sounds can be recorded with high quality. The 32-bit float recording will disable the limiter |
| 48 kHz / 24-bit | This format records standard 24-bit WAV files. Adjust the recording gain, so that the clip indicators do not light up red while recording. In the 24-bit format, the limiter is always enabled |
| Auto Power Off Time | Use auto power off to automatically power off your TRACK E after 2, 4, 8 or 12 hours. During recording and playback auto power off is disabled. Reading external timecode or formatting the SD card will reset the power off time |
| Headphone Volume | Adjust the volume of the headphone output* |
|
*Please note:US version has the headphone output deactivated during recording
|
|
| Headphone Output Routing | Select the headphone output routing. |
| Audio/Audio | Audio signal is routed to left and right output channel (default) |
| TC (0dB)/Audio | Timecode with a level of 0dB is routed to the left channel, audio signal is routed to the right channel |
| TC (18dB)/Audio | Timecode with a level of -18dB is routed to the left channel, audio signal is routed to the right channel |
|
Please note:Use high-quality cables with good isolation between audio channels and high-impedance input on the input side to prevent audio channel interference or bleeding.
|
|
| LED Brightness | Adjust the brightness of the LEDs here |
| Level LED while Recording | Here you can deactivate the level LED completely during recording |
| User Switch Assignment | Click on the field and choose an action for your user switch on the TRACK E when pulling it up. |
| Not used | Pulling up the user switch will not trigger any action |
| Start / Stop Playback | You can now listen to your last recorded file when the user switch is pulled up |
| Start / Stop Recording | This preset action enables manual start/stop control of audio recording using the user switch. |
| Start / Stop Test Tone | This will output an test tone (1kHz at -18dB) through the headphone output. |
| Format SD Card | To format your SD card, just press the button and confirm it in the pop-up window |
| General information | |
| Firmware Version | Shows the current firmware version running on the device |
| Hardware Revision | Shows the hardware version of this unit |
| Hardware Serial No. | Shows the serial number of your TRACK E |
| App Version | Shows the current software version of your setup app |
| Real Time Clock (RTC) | Shows the current time and date of the internal real time clock |
| Limiter | The limiter icon is only visible in your monitoring view. If you select 48 kHz / 24-bit recording format, the limiter is enabled. In 32-bit float it will be disabled. The limiter will compress the dynamic range, so that sudden volume peaks can be prevented. |
4.3 App Settings
| Theme | Here you can choose a light or dark theme for the setup app |
| Audio Monitoring | Here you can select one of two audio monitoring modes: loudspeaker or earpiece monitoring (details see audio monitoring) |
| Safe Mode | If this mode is enabled, you need to press the STOP button for 2 seconds before the audio recording stops |
| Notifications | Enable this option if you want your TRACK E(s) to inform you about critical events, even if your app is in background: Low battery, low remaining recording time, recording stopped at device or other errors during recording. |
| Remove all Added Devices | Here you can remove all devices from the device list at once |
| Manuals | Here you can find the Tentacle manuals |
| Ask for Help | Here you can send a support request directly to the Tentacle support team |
| Acknowledgements | License information of used open-source components |
| App Version | Here you can view the current app version |
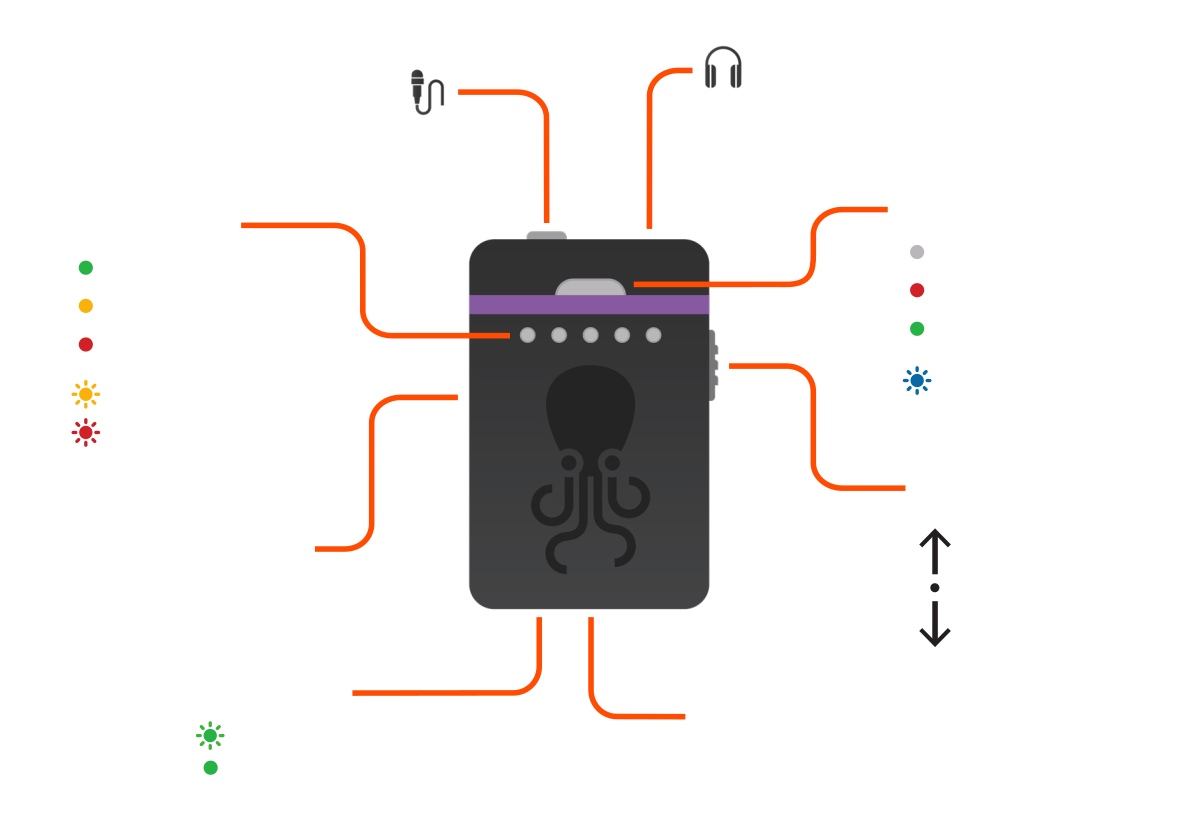
5 User Switch
The TRACK E has a multipurpose user switch on the right side.
| Power On | Pull down the user switch until the level LED will start a blue animation |
| Power Off | Pull down the user switch for more than 5 seconds. The status LED will flash white until the TRACK E is turned off |
| Start Recording | Pull up the user switch. The status LED will light up red during recording (default) |
| Stop Recording | Pull up the user switch again. The status LED will go back to white |
The Start / Stop Recording action for the user switch is predefined, but can be assigned differently in the settings section of the menu (see user switch assignment)
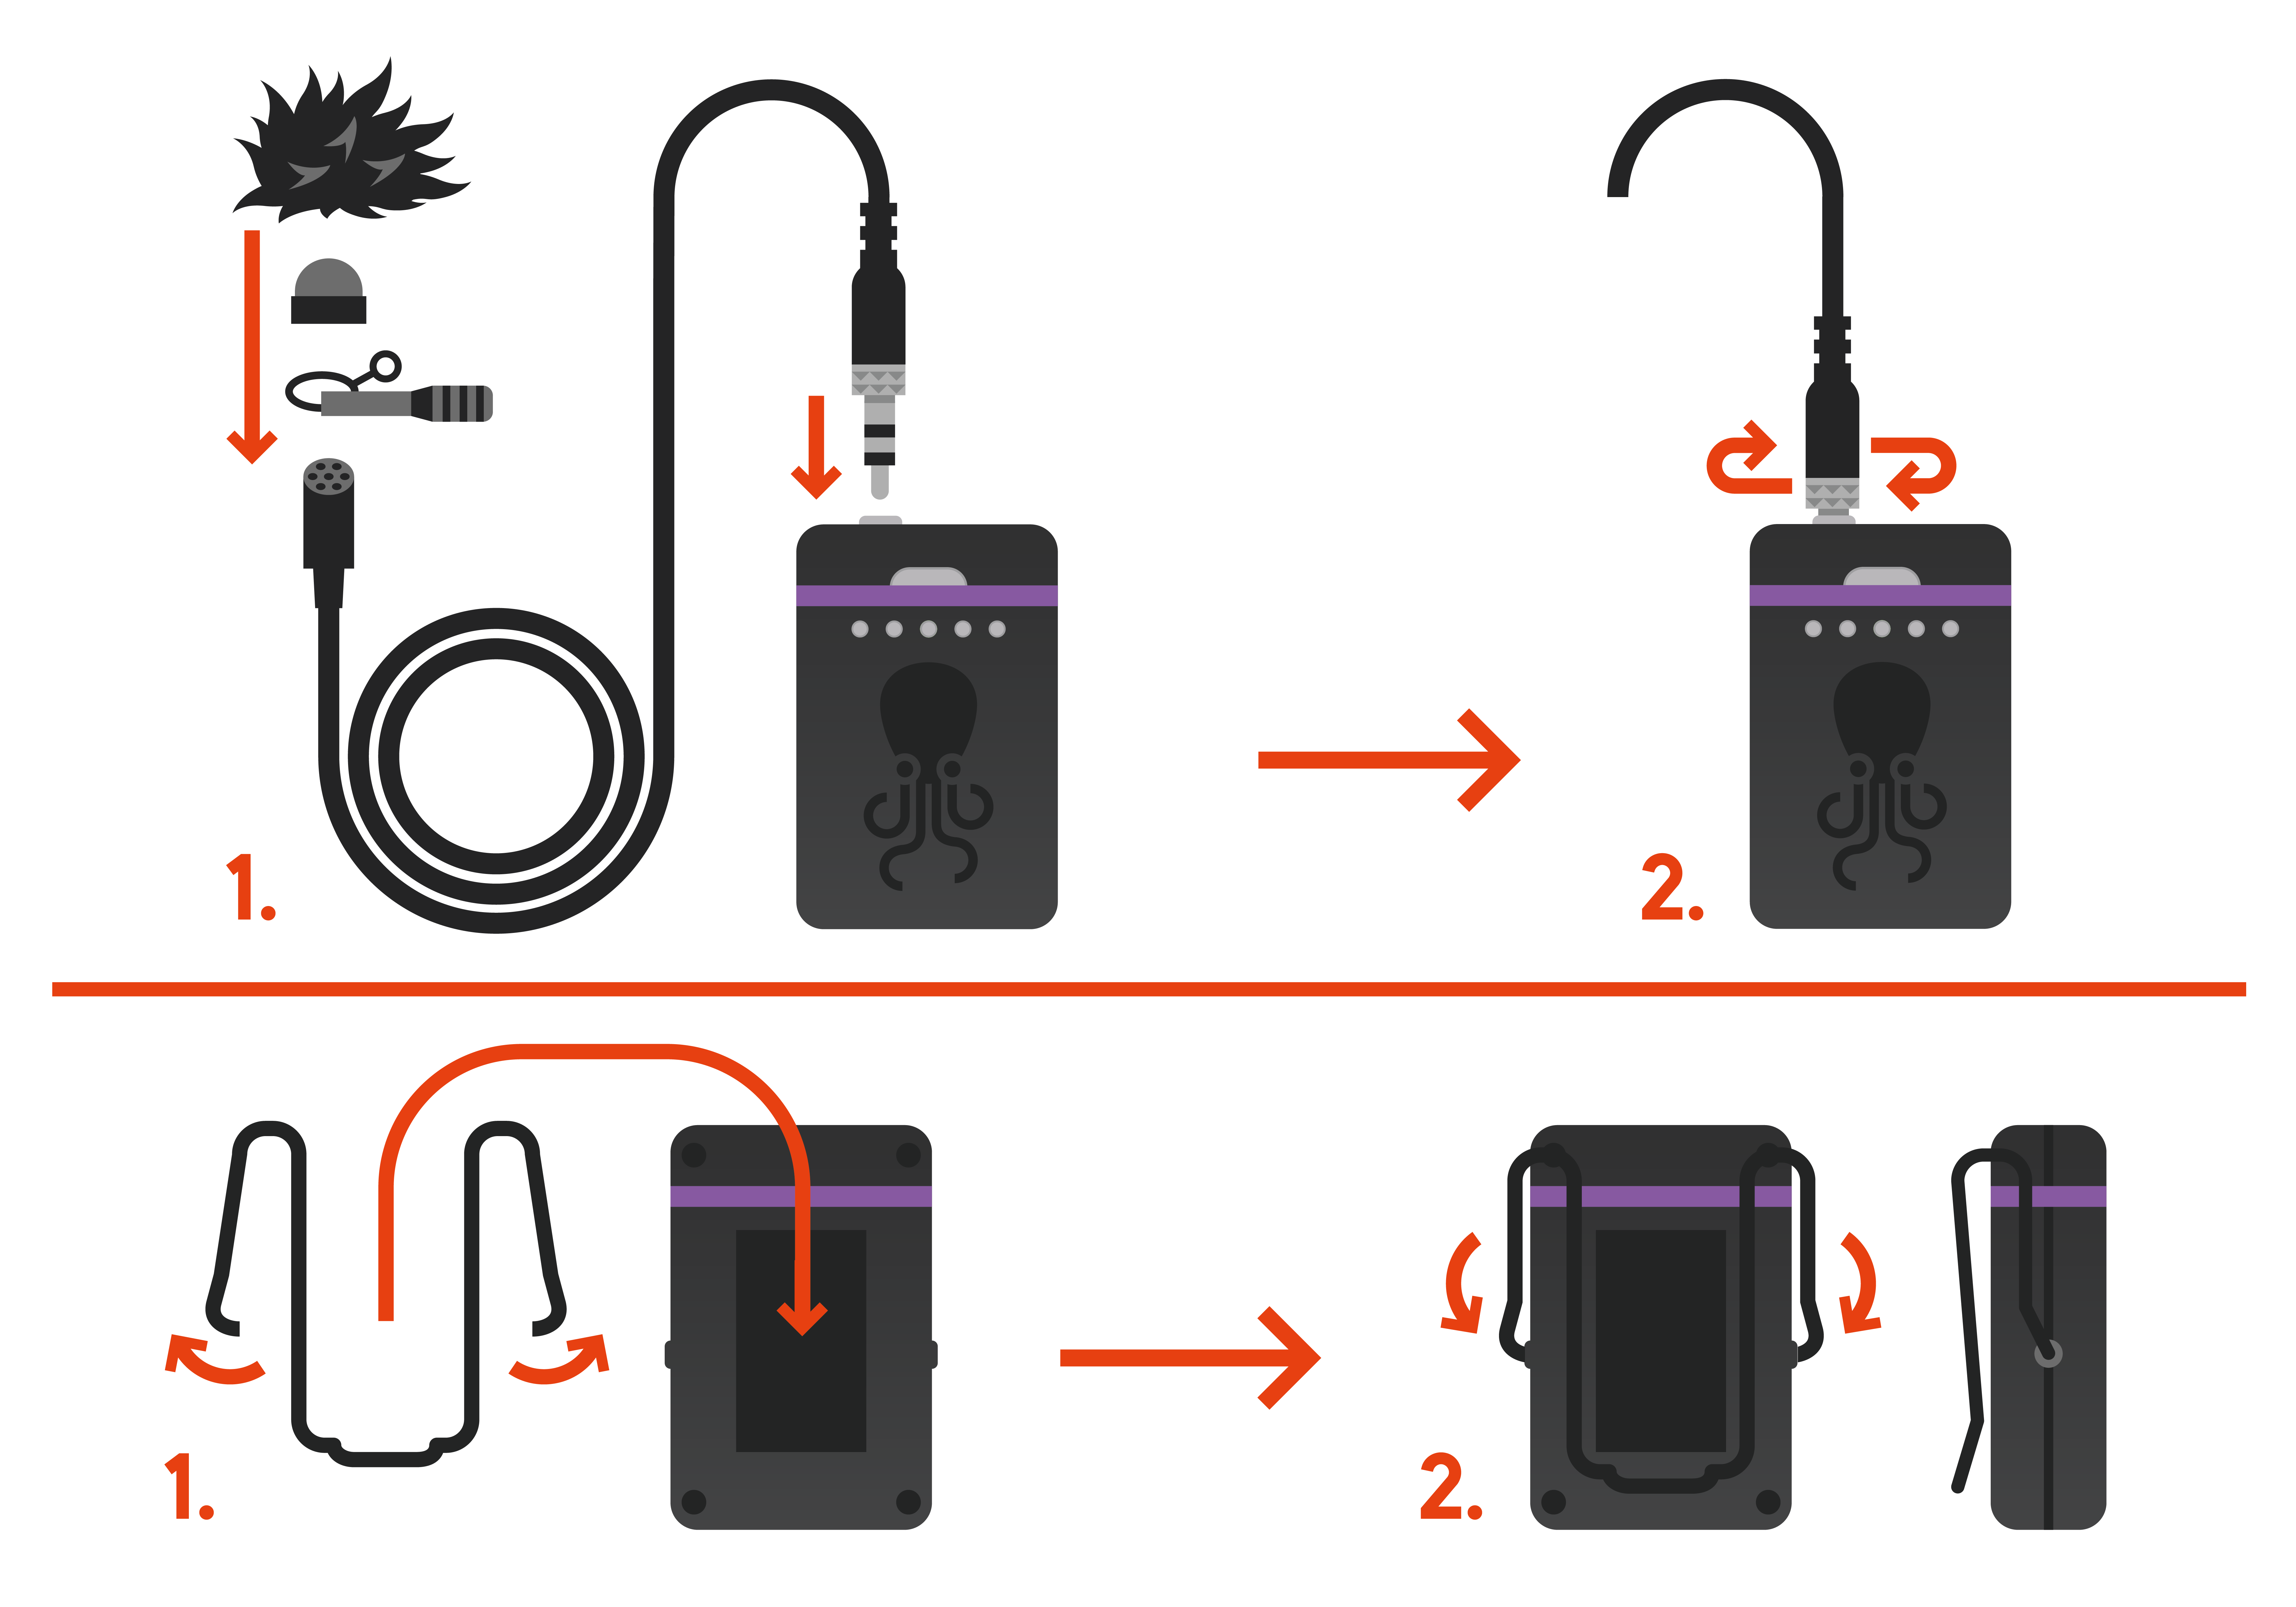
6 TRACK E Microphone
The TRACK E set includes a versatile lavalier microphone (omnidirectional characteristic) with windjammer and clip. Of course, Tentacle TRACK E is compatible with all common lavalier, electret directional and dynamic microphones. An adapter to 3.5 mm mini jack with a standard Sennheiser wiring may be necessary.
6.1 Microphone input
The TRACK E has a 3.5mm mini jack microphone input with screw lock. 5V plug-in power is activated by default. To ensure compatibility with dynamic microphones, you can disable plug-in power within the Tentacle Setup App. This input can also be used to jam-sync your TRACK E from any standard timecode source via cable (see timecode jam sync)
6.2 Microphone adapters
To connect an even wider range of lavalier microphones to TRACK E, you may need an adapter with a standard Sennheiser wiring. The adapters and a variety of accessories are available at your local dealer, or at shop.tentaclesync.com
7 Headphone Output
To monitor while recording* please connect headphones with a 3.5mm mini jack connector to the headphone out of the TRACK E device. For a playback of your already recorded files, you also need to open the Setup App playback section in the device’s menu. You can adjust the headphone level for each device in the app.
8 microSD card
The 16GB microSD card is located on the left side of the TRACK E. Just pull out the cover and push the card in to remove it. This card can record up to 30 hours in 24-bit recording format and 23 hours in 32-bit Float recording format. Always format the microSD card in the Setup App via Bluetooth. You’ll find the button in the settings section of the menu.
9 Rechargeable Battery
The TRACK E has a built-in, rechargeable and replaceable Lithium-Polymer battery. Charging is possible via USB-C. The charging status will be shown by the charging LED right next to the USB-C port. The internal battery can be charged from any USB power source.
The charging time is max. 2 hours if the battery is completely empty. Fully charged, TRACK Es can run for up to 10 hours. When the battery is at less than 10%, Tentacle indicates this by flashing the level LED yellow several times. The device continues to run in this state, until it powers itself off once the battery level reaches 3%. If the battery is completely empty, the TRACK E can no longer be switched on before it has been recharged.
The battery is easily replaceable, once the performance is decreasing after 2-4 years depending on the use. A battery replacement kit can be obtained from Tentacle Sync.
In this case please contact support@tentaclesync.com
10 USB-C Port and Card Reader
The USB-C port located at the bottom of TRACK E is used for both charging and reading the SD card.
As a card reader the USB-C port is used for fast data transmission. This way, there is no need to remove the microSD card from the TRACK E. You can transmit your files directly from the Tentacle TRACK E to your computer.
- Connect your TRACK E to your computer via the included USB-C cable. Make sure the TRACK E is switched off (card reader mode). You have to push the connector all the way into the TRACK E until it snaps in with a subtle ‚click‘ sound.
- A hard drive icon will appear on your desktop. You can drag and drop your files directly from the TRACK E onto your computer.
- To remove the TRACK E, please eject it correctly from your computer.
11 Firmware Update
You will find the newest firmware version for your TRACK E here:
Tentacle Downloads11.1 Before you start
- Prior to performing the update, please back up your microSD card in case it contains important files.
- Make sure your TRACK E has sufficient battery power. If you are using a laptop for the update, make sure it also has adequate battery or is connected to a power source.
- The Tentacle Sync Studio software (macOS) or the Tentacle Setup software (macOS/Windows) should not be running at the same time as the Firmware Update App. The Tentacle can only be recognized by one Tentacle software at a time.
11.2 Update procedure
- Download the firmware updater app, install it and open it.
- Connect your TRACK E via USB cable to the computer and switch it on.
- Wait for the updater app to connect to your TRACK E.
- If an update is needed, start the update by pressing the „Start Firmware Update“ button.
- During the update process (few minutes) your TRACK E status and level LEDs will blink purple.
- The Update App will tell you when your TRACK E was successfully updated.
- To update more TRACK Es you have to close and start the app again.
In the unusual case that the firmware update fails, your device needs to be restored. In this case please contact: support@tentaclesync.com
12 Technical Specifications
* US Version: Headphone output is deactivated during recording
13 Warranty and Safety regulations
Intended use
The device is designed to record audio signals via a suitable external microphone (lavalier microphone). It must not be connected to other devices. The device is not waterproof and should be protected against rain. For safety and certification reasons (CE) you are not permitted to convert and/or modify the device. The device can be damaged if you use it for purposes other than those mentioned above. Moreover, improper use can cause hazards, such as short circuits, fire, electric shock, etc. Read through the manual carefully and keep it for later reference. Give the device to other people only together with the manual.
Safety notice
A guarantee that the device will function perfectly and operate safely can only be given if the generally standard safety precautions and device-specific safety notices on this sheet are observed. The device is intended for professional use. The rechargeable battery integrated in the device must never be charged in an ambient temperature below 0 °C and above 40 °C! Perfect functionality and safe operation can only be guaranteed for temperatures between -20 °C and +60 °C. The device is not a toy. Keep it away from children and animals. Protect the device from extreme temperatures, heavy jolts, moisture, combustible gases, vapors and solvents. The safety of the user can be compromised by the device if, for example, damage to it is visible, it doesn't work anymore as specified, it was stored for a longer period of time in unsuitable conditions, or it becomes unusually hot during operation. When in doubt, the device must principally be sent in to the manufacturer for repairs or maintenance.
Disposal / WEEE notification
This product must not be disposed of together with your other household waste. It is your responsibility to dispose of this device at a special disposal station (recycling yard), at a technical retail center or at the manufacturer.
FCC declaration
This device contains FCC ID: SH6MDBT50Q
This device has been tested and found to comply with part 15B of the FCC rules. These limits are designed to provide reasonable protection against harmful interference in a residential installation. This equipment generates, uses and can radiate radio frequency energy and, if not installed and used in accordance with the instructions, may cause harmful interference to radio communications. However, there is no guarantee that interference will not occur in a particular installation. If this equipment does cause harmful interference to radio or television reception, which can be determined by turning the equipment off and on, the user is encouraged to try to correct the interference by one or more of the following measures:
- Reorient or relocate the receiving antenna.
- Increase the separation between the equipment and the receiver.
- Connect the equipment into an outlet on a circuit different from that to which the receiver is connected.
- Consult the dealer or an experienced radio/TV technician for help.
Modification to this product will void the user’s authority to operate this equipment. This device complies with part 15 of the FCC rules. Operation is subject to the following two conditions. (1) This device may not cause harmful interference. (2) This device must accept any interference received, including interference that may cause undesired operation.
Industry Canada declaration
This device contains IC: 8017A-MDBT50Q
This device complies with Industry Canada license-exempt RSS standard(s). Operation is subject to the following two conditions: (1) this device may not cause interference, and (2) this device must accept any interference, including interference that may cause undesired operation of the device.
This digital device complies with the Canadian regulatory standard CAN ICES-003.
Declaration of conformity
Tentacle Sync GmbH, Wilhelm-Mauser-Str. 55b, 50827 Cologne, Germany
declares herewith that the following product:
Tentacle TRACK E timecode audio recorder
complies with the provisions of the directives named as follows, including changes in them that apply at the time of the declaration.
This is evident from the CE mark on the product.
EN 55032:2012/AC:2013
EN 55024:2010
EN 300 328 V2.1.1 (2016-11)
Draft EN 301 489-1 V2.2.0 (2017-03)
Draft EN 301 489-17 V3.2.0 (2017-03)
EN 62479:2010
EN 62368-1:2014 + AC:2015


13.1 Technical support and Information
support@tentaclesync.com
https://tentaclesync.com
TENTACLE SYNC GmbH
Wilhelm-Mauser-Str. 55b, 59827 Cologne, Germany
Tel.: +49 221 677 832 032